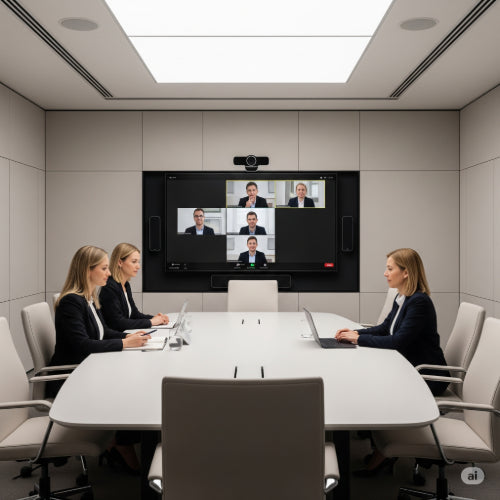
Your Step-by-Step Guide to Setting Up a Video Conference Room
In today's interconnected world, video conferencing isn't just a convenience; it's a necessity for effective communication, collaboration, and maintaining strong connections with remote teams, clients, and partners. A well-designed video conference room eliminates technical glitches and ensures everyone can participate fully.
Here’s a step-by-step guide to setting up a video conference room that delivers clear audio, crisp video, and a professional environment.
Step 1: Assess Your Needs and Room Layout
Before you buy any equipment, take stock of your requirements and the space you're working with.
- Room Size & Capacity: How many people will typically use the room? This determines the size of your display, the type of camera, and the microphone pickup range you'll need.
- Purpose: Is it for small, informal huddles or large, formal presentations? This influences the complexity of your setup.
- Existing Infrastructure: Do you have network drops, power outlets, and adequate lighting?
- Acoustics: Are there hard, reflective surfaces (glass, bare walls) that might cause echoes?
- Lighting: Is there sufficient, even lighting? Avoid harsh backlighting from windows.
- Connectivity: Will you use wired or wireless connections for devices?
Step 2: Choose Your Core Equipment
This is where the magic happens. Prioritize quality for a reliable experience.
-
Display(s):
- Size: Choose a size appropriate for the room. For small to medium rooms, a 55-75 inch 4K display is often sufficient. Larger rooms may require larger screens or dual displays (one for content, one for participants).
- Type: A high-quality monitor or commercial display is generally better than a TV, as TVs often have higher input lag and may not be designed for continuous operation.
- Mounting: Decide between a wall mount (fixed or articulating) or a mobile cart.
-
Camera:
- PTZ (Pan-Tilt-Zoom) Camera: Ideal for larger rooms, allowing you to focus on speakers, pan across the room, and zoom in/out. Look for optical zoom for better quality.
- Fixed-Angle / Wide-Angle Camera: Suitable for smaller huddle rooms where everyone is close to the camera.
- "Smart" Cameras: Some cameras offer AI features like auto-framing (keeping all participants in view) or speaker tracking.
- Resolution: Aim for at least 1080p (Full HD), with 4K becoming more common for a crisper image.
-
Microphone(s): Audio quality is paramount. Poor audio can derail a meeting faster than poor video.
- Omnidirectional/Boundary Mics: Good for picking up sound from all directions in a smaller room (e.g., a "conference phone" puck).
- Tabletop Array Microphones: Multiple microphones in a single unit, often with beamforming technology to focus on voices and reduce background noise.
- Ceiling Microphones: Discreet and effective for larger rooms, providing excellent coverage without cluttering the table.
- USB vs. Analog: USB mics are simpler for basic setups; analog mics (XLR) offer more flexibility but require an audio mixer.
-
Speaker(s):
- Integrated with Microphone (Soundbar/Conference Phone): Convenient for smaller rooms.
- Dedicated Speakers: For larger rooms, separate speakers (e.g., wall-mounted soundbar, ceiling speakers) will provide clearer audio distribution. Ensure they are positioned to avoid feedback with microphones.
-
Room Computer/Codec:
- Dedicated Mini-PC: A small form-factor PC (e.g., Intel NUC, Mac mini) running your preferred conferencing software (Zoom, Microsoft Teams, Google Meet, etc.) offers flexibility.
- Hardware Codec: Dedicated appliances from brands like Poly, Cisco, or Logitech are purpose-built for video conferencing, offering robust performance and integration with their ecosystem.
- BYOD (Bring Your Own Device) Setup: If users will primarily connect their laptops, ensure you have appropriate cabling (HDMI, USB-C) and perhaps a display hub.
Step 3: Plan Your Cabling and Connectivity
A neat and reliable setup depends on thoughtful cabling.
- Network: Hardwired Ethernet is always preferred over Wi-Fi for stability and bandwidth, especially for video. Ensure a strong, dedicated connection.
- Power: Plan for enough power outlets for all devices, potentially using a surge protector.
- Video Cables: HDMI for display, USB for cameras and microphones. Consider the length needed to reach your room PC/codec.
- Cable Management: Use cable ties, sleeves, and raceways to keep wires tidy and out of sight. This prevents tripping hazards and creates a professional look. Run cables through walls or under floors if possible for a clean aesthetic.
Step 4: Installation and Setup
Once your equipment arrives, it's time to put it all together.
- Mount Displays and Cameras: Securely install your display(s) and camera(s) according to manufacturer instructions. Ensure the camera is positioned to capture all participants.
- Connect Peripherals: Connect your camera, microphones, and speakers to your room computer/codec.
- Network Connection: Connect the room computer/codec to your wired network.
- Power On: Plug in and power on all devices.
-
Software Installation/Configuration:
- Install your chosen video conferencing software.
- Configure audio and video settings within the software, selecting the correct camera, microphone, and speakers.
- Run test calls with colleagues to check audio levels, video clarity, and overall functionality.
Step 5: Optimize the Environment
The room itself contributes significantly to the meeting quality.
- Lighting: Use soft, diffused lighting. Avoid overhead spotlights that create harsh shadows. If windows cause backlighting, use blinds or curtains.
-
Acoustics:
- Soft Furnishings: Add rugs, curtains, or upholstered furniture to absorb sound and reduce echoes.
- Acoustic Panels: For larger rooms or persistent echo issues, consider installing acoustic panels on walls.
- Background: Choose a simple, uncluttered background behind the main seating area. A plain wall or a subtle branded backdrop works best. Avoid busy patterns or windows that distract.
- Power Access (Tabletop): Consider a conference table with integrated power outlets and USB ports for participant laptops and charging.
Step 6: Test, Train, and Troubleshoot
The final, crucial step is testing and preparing users.
- Comprehensive Testing: Conduct multiple test calls with different scenarios – full room, few participants, sharing content. Test audio clarity, video quality, screen sharing, and remote control functionality.
- User Training: Create simple instructions for starting a meeting, sharing content, and troubleshooting common issues. Consider laminated quick-start guides on the table.
- Dedicated IT Support (if applicable): Ensure someone is responsible for maintenance and quick troubleshooting.
- Regular Updates: Keep all software and firmware updated for optimal performance and security.
Local Considerations (General Trias, Calabarzon)
When sourcing equipment in the Philippines, especially in areas like General Trias, you have a few options:
- Local Electronics Stores: Larger electronics stores in nearby cities like Dasmariñas, Bacoor, or even Metro Manila will carry consumer-grade webcams, microphones, and monitors.
- IT & AV Solution Providers: For more professional-grade equipment and installation services, search for IT or Audio-Visual (AV) solution providers in Metro Manila or Cavite. They often have expertise in designing and deploying conference room systems.
- Online Marketplaces: Lazada and Shopee offer a wide range of components, but be diligent in checking seller ratings and product reviews.
By following these steps, you can create a video conference room that facilitates seamless communication and enhances collaboration, making your meetings more productive and less stressful for everyone involved. Good luck!